COACTION
Coaction is an open source program to link your hoop to the computer. There is an interface with plenty of buttons but luckily you only need concern yourself with a few of them, and they will be described below.
SET UP COACTION ON YOUR COMPUTER
Coaction will work with windows or mac.
For windows operating system, preferably XP, Vista or 7. When CoActionOS Link is installed, it copies the driver files to C:\Windows\inf (or whatever your Windows directory is). When your hoop is connected, Windows 7 automatically installs the driver.
CLICK to DOWNLOAD the CoActionOS Link Installer – WINDOWS
When CoActionOS Link is installed, it copes the driver files to C:\Windows\inf.
However, Windows 8 is not able to automatically install the drivers. To install the drivers follow the following steps:
- After installing CoActionOS Link, connect the CoActionOS powered device
- Move CoActionOS-cdc-acm.inf and coactionos-cdc-acm.cat from C:\Windows\inf to the Desktop (or another easily accessible location)
- Start the device manager
- You should see “CoActionOS” under other; right click on it and select “Update Driver Software”
- Select the option to specify a location for the driver
- Specify to installed from the Desktop (e.g., C:\Users\you\Desktop)
- Windows 8 should successfully install the driver
These steps only need to be taken the first time a device is connected. Subsequently, other CoActionOS devices should be automatically loaded by Windows 8.1.
For Mac:On a Mac the drivers are automatically installed.
CLICK to DOWNLOAD the CoActionOS Link Installer – MAC
UPLOADING SAVED HOOPS TO THE COMPUTER
To save a custom hoop from your hoop to your computer:
1) Attach the hoop and turn it on. Leave the hoop on the whole time. NOTE: WARNING – the USB port is the most vulnerable part of the hoop and when you have it connected to computer its easy to stress the connection by moving the hoop or disturbing the cable – please make sure NOT to move the hoop when you have it connected via USB and to put it in a position where the USB port in the connector of the hoop is not being stressed. Best to use the Velcro on the cable as well.
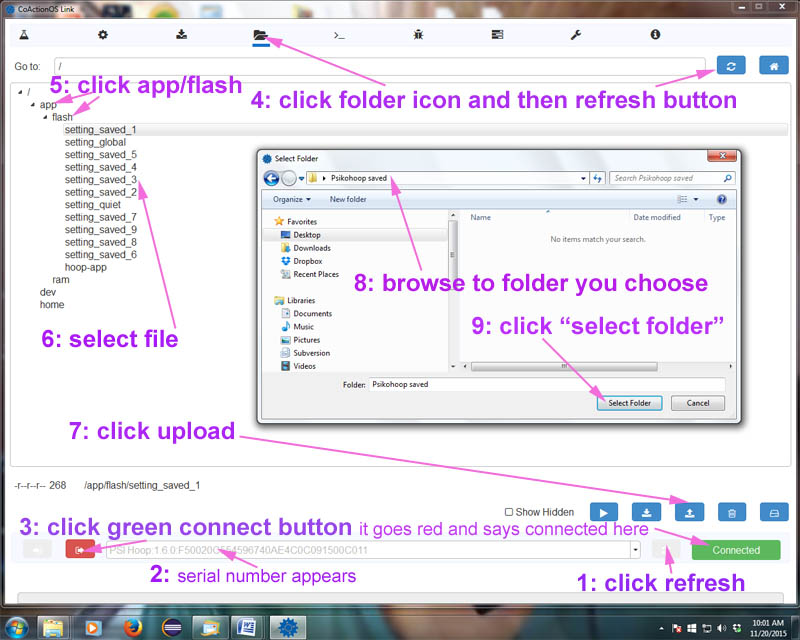
2) Press the blue refresh button (two arrows forming a circle). You should see a long set of numbers and letters appear in the white box to the left.
3) Press the Green connect arrow button in the bottom left of CoActionOS Link. You should now see “Connected” on the bottom right side of CoActionOS Link.
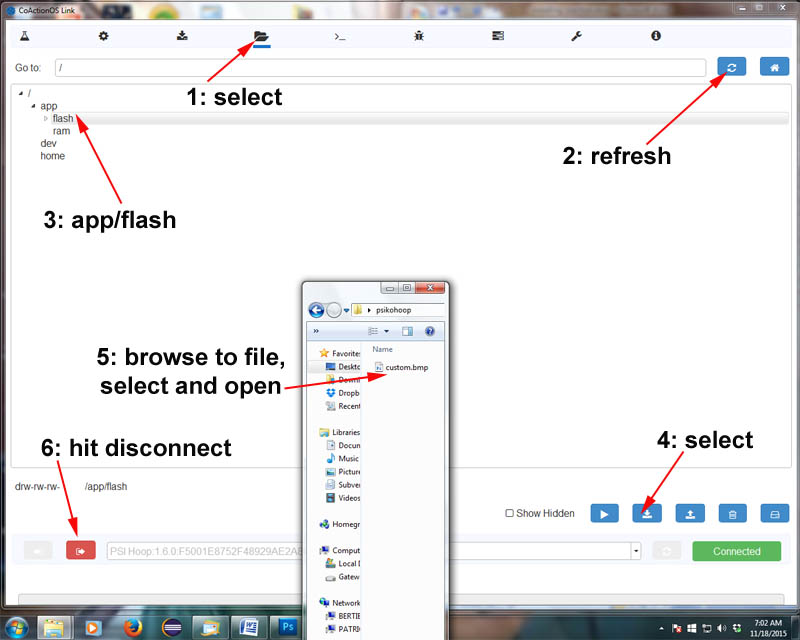
4) In the top row of icons, click the folder icon (third from the left).
5) Click the blue refresh button near the top right (two arrows forming a circle).
6) Click app, then flash. NOTE: as of april 2016 the location of the saved settings is in “home” and not flash. Same instructions apply, but look for the saved settings in “home”. You should see files like global and perhaps custom.bmp. You should also see some files named Setting_saved_1, Setting_saved_2 etc possibly all the way to Setting_saved_9. These are the hoops saved in the save pack (either custom hoops you developed, or the default hoops from the saved pack). Hoop Setting_saved_1 is the first hoop in the saved pack, forward flips would bring you to hoop Setting_saved_2 and Setting_saved_3. Side flips would bring you to Setting_saved_4 or Setting_saved_7 See the chart below:
| Hoop Save Packs | ||
|---|---|---|
| Pack 1 | Side Flips Pack 2 | Side Flips Pack 3 |
| Setting_saved_1 | Settings_saved_4 | Settings_saved_7 |
| Settings_saved_2 | Settings_saved_5 | Settings_saved_8 |
| Settings_saved_7 | Settings_saved_8 | Settings_saved_9 |
To download the first saved hoop from the hoop onto your computer:
7) Click the file Setting_saved_1 so it is highlighted in blue.
8) Press the blue “transfer file from hoop” button that shows an arrow pointing up. This is one of the 5 blue buttons near the bottom of the screen (near the trash icon). This “transfer file from hoop button” is the 3rd button from the left.
9) In the left-hand screen of the “select folder” either make a folder now where you want these files to be saved, or navigate to an existing folder. That folder should now appear in the “folder” box.
10) To save the “Setting_saved_1″… Click the “select folder” button at the bottom right. It wont give you any indication that its saved, but you can navigate to the actual folder and check that it is there.
11) Repeat steps 7,8 and 10 for each saved hoop you want to upload to your computer.
DOWNLOADING CUSTOM BITMAP FROM COMPUTER to PSIKOHOOP
DOWNLOAD YOUR CUSTOM IMAGE
Connecting the hoop: Open Start -> CoAction OS -> CoActionOS Link.
Connect the hoop USB to the computer. If its your first time connecting your hoop you’ll need to wait while the computer installs drivers. If the sound is on, you should hear the USB “gadong” when its finished installing, or click on the little icon at the bottom right of the screen and it will show you. If you have windows 8 then follow those instructions above.

When the driver has finished installing, press blue refresh button at the bottom of the coactions interface, and you should see the chip serial number appear. If that number doesn’t appear it means that either the hoop is not connected properly through USB, or the driver is not installed. Then press the Green arrow near the bottom left corner. This connects coactions to the hoop master board. If it connects properly then the red “Disconnected” display will go green and show “connected”.
Remember you MUST press the disconnect (red button near the green button) before physically unplugging the USB cable at either the computer or hoop end. If you omit this step, you will need to close and then restart Coaction and you will need to do a hard reset on the hoop. (Press the button down for 10 seconds and then let go and the hoop will then go through a start up sequence).
If you want a custom image, symbol or word, we can try to make that for you, please email merlin@psihoops.com
Or if you have some photoshop skills and a lot of patience, you can try yourself using the following instructions.
The resolution is low, so its difficult to make things appear clearly…try for very simple at first, and then add complexity as you like. The bitmap is only 50 pixels wide by 25 high , which is just over 1000 pixels, and you can compare that to a cell phone that may take pictures at more than 10 million pixels. So you have very little to work with.
1)Download the custom.bmp. ![]()
It will act as a template for you to make your own image.
2) Open it in Photoshop, or another image editor that will preserve the bmp format (must be saved as a 24-bit bitmap, with no compression).
3) Edit the bitmap as you like. From left to right are the APPROXIMATE colors to display around the hoop. The image is displayed twice, once on the left side of the hoop and once on the right side of the hoop. From top to bottom are the changes in colors over time, so if you create a rainbow that goes from red to green to blue vertically, the hoop will change (very fast) between those approximate colors.
NOTE: if you are trying for letters, say a name or acronym, best to limit to 3 letters because of the low resolution and the curvature at either side, more than three letters is very tricky.
Once you have something you think might work, save it as a BMP (24-bit, windows) and call it “custom.bmp” (it wont work if you give it another name). Save it to a folder on the desktop or other location its easy for you to access.
DOWNLOADING SAVED HOOPS FROM COMPUTER

To load a saved hoop from your computer onto your hoop:
1) If you want to change the saved slot location rename the file according to which saved slot you want from Setting_saved_1 to Setting_saved_9
2) Attach the hoop and turn it on. Connect to coactions interface. Leave the hoop on the whole time.
3) Press the blue refresh button at bottom right (two arrows forming a circle). You should see the serial number – a long set of numbers and letters appear in the white box to the left.
4) Press the Green connect arrow button in the bottom left of CoActionOS Link. You should now see “Connected” on the bottom right side of CoActionOS Link.
5) In the top row of icons, click the folder icon (third from the left).
6) Click the blue refresh button near the top right (two arrows forming a circle).
7) Click app, then flash. NOTE: as of april 2016 the location to put the saved settings is “home” and not “flash”. Other than that the instructions are the same.
8) Press the blue “transfer file to hoop” button that shows an arrow pointing down. This is one of the 5 blue buttons near the bottom of the screen (near the trash icon). This transfer file to hoop button is the 2nd button from the left.
9) Select the file from your computer and press OK. If you want to transfer more than one saved file you can do that by selecting each (hold down the control key when clicking the file). Then when you press the blue “transfer file to hoop” button, all the files you selected will be transferred (up to the total of 9 saved files and one custom file)
10) If you didn’t transfer all the files you wanted, and you wish to transfer more files you will need to click back to CoActionOS ( if the program moved to the background) , then click app, then flash again in the folder area. (do steps 5 to 9 again for each file you want to transfer).
UPGRADING PROGRAM
See pictures below instructions.
You need to ask merlin@psihoops to make you a file containing the upgrades for your particular hoop with its specific number of LEDs and also the settings of the sensors, which may change from hoop to hoop. Merlin will email you a zipped folder called “hoop-app.zip”. Open this zipped folder and then either copy/paste or drag and drop the file folder hoop-app onto your desktop.
Open Start -> CoAction OS -> CoActionOS Link.
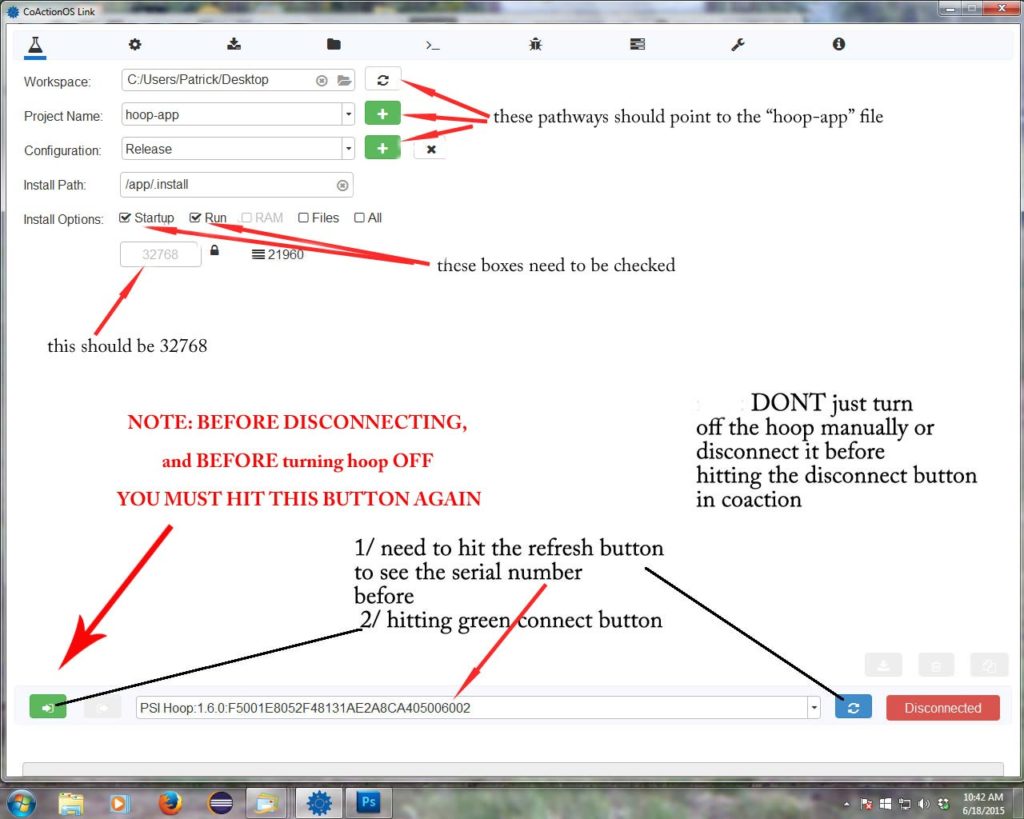
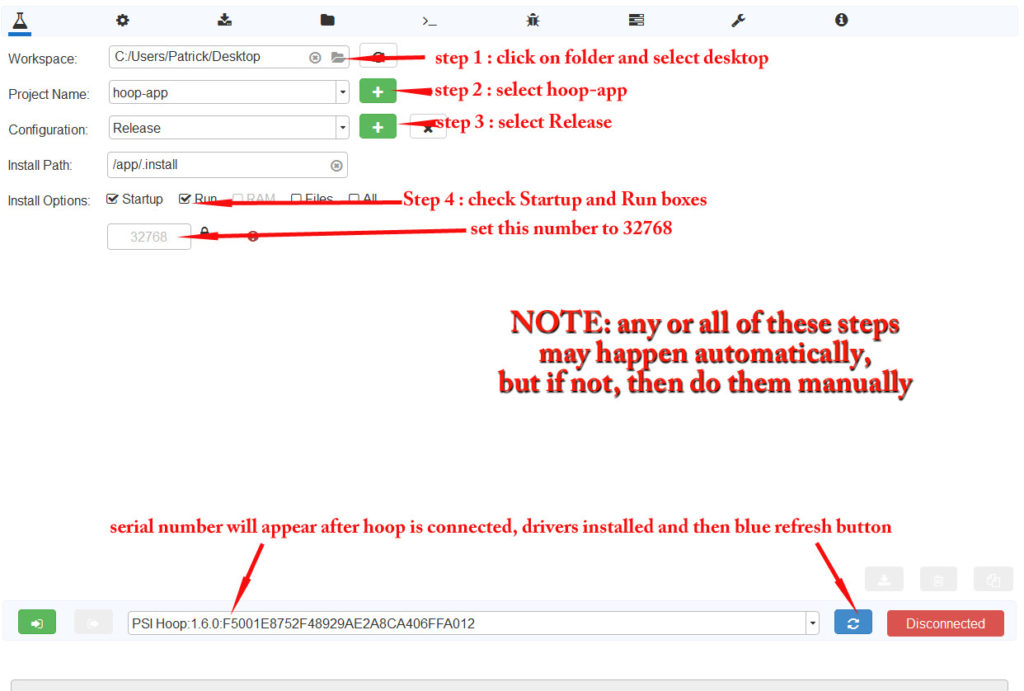
Now you need to set up coaction to be able to find and use the file hoop-app. See the diagrams “connecting coaction for new program_overview” and “connecting coaction for new program_a-e”
Step 1 : in the first screen of coaction, which has a flask icon at the top left of the screen (click that to open it, if it doesn’t already have a blue bar under the flask icon), go to the box next to Workspace and click on the folder icon. The “select folder” dialog box will appear. Click on “desktop” which will be on the left hand side near the top of that dialog box. In the folder view at the bottom of that dialog box “desktop” will appear, and then click under that. “select folder”. In coaction the workspace should now read C:/Users/your name or the name of the computer user/Desktop.
Step 2 : Connect the hoop through a USB connection. Its inside the hoop connector. The connector TWISTS, then pulls – please don’t force it or that could be the death of the hoop. The USB port is the most delicate part of the hoop so PLEASE don’t stress it when its connected – be extra careful not to pull on the cable or put pressure on the connection. The metal part of the cable does NOT push all the way into the port, only about 7/8 of it goes in and you should feel it snug up.
If its your first time connecting you’ll need to wait while the computer installs drivers, and possible follow driver installation steps (see above) if using Windows 8. You might need to reopen CoActionOS Link once the drivers are installed.
The hoop lights will appear and then go to a single blue LED, showing the hoop is connected to the computer (or a power source) If the light turns red it means that your hoop has become disconnected.
Step 3 : When everything is ready press press the blue refresh button right bottom of coaction screen and you should see the chip serial number appear.
If serial number doesn’t appear then something is wrong and no point proceeding. Perhaps the drivers didn’t fully install, or the hoop is not properly connected. The press the Green arrow near the bottom left corner. This connects to the hoop. If it connects properly the red “Disconnected” display will show “connected”. You MUST press the disconnect (red button near the green button) before physically disconnecting the hoop from the usb connection.
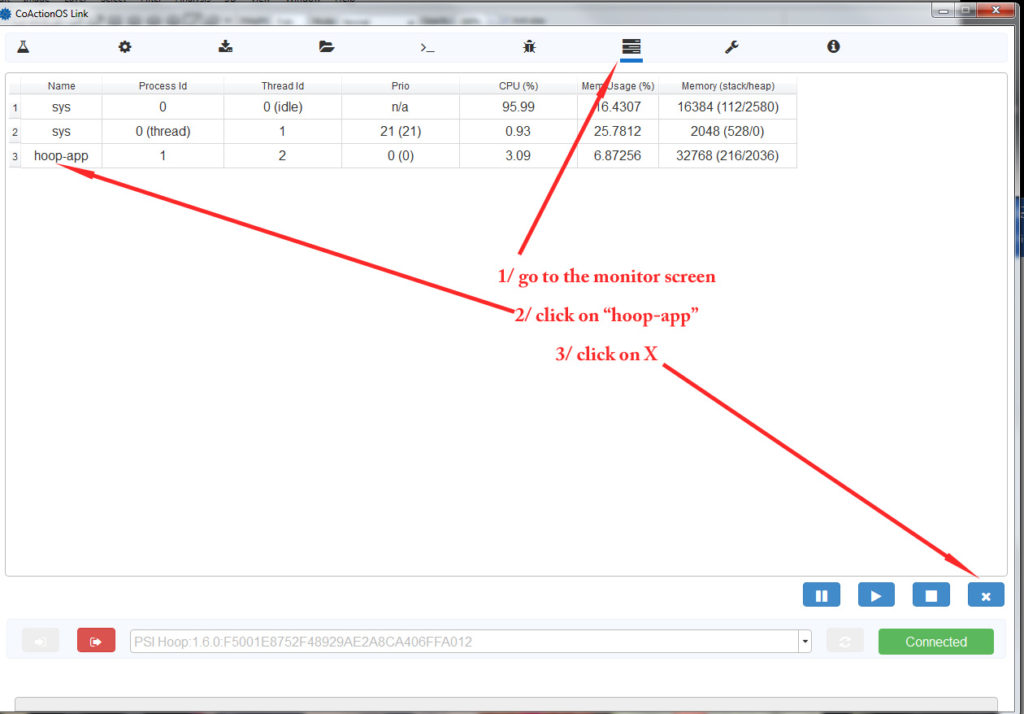
Step 4 : First you have to STOP = X the program that is currently running on the hoop. Go to the monitor tab in coactions (third from right). Click it. Click the third item down “#3 Hoop-App” and then go to the symbols at the bottom right of the page and click X which will stop the program running .
Step 5 : Click the top flask tab (1st on left).
Please keep the hoop absolutely steady for this next step without moving it or bumping it or jiggling the cable etc. Should only be for less than 10 seconds.
Press the button with the arrow pointing down (near the bottom of the gui) to install the hoop program. This now installs and runs. In coaction a blue progress bar should travel across the screen a couple times. Lights should appear in your hoop, and then go back to a single blue LED. In coaction a number of lines of type will appear on the screen.
Please note the accel values for X,Y and Z and email them to me.
IMPORTANT STEP Step 6 : Click the red disconnect button that is next to the green arrow button on the left of the screen….the long button on the right of the screen should say “Disconnected”.
Step 7 : physically disconnect the USB cable from the hoop.